Monday, January 17, 2011

Time to Pull

My coolant problem wasn't getting solved. This engine is so high miles that I should just do a complete rebuild and make sure its done correctly from the ground up.

 So this is what I'm starting out with. Supra is parked in the garage so I have a flat surface to work on. The rear tires are backed up onto ramps, and the front was lifted and rests on jack stands. A friend was kind enough to let me borrow these tools.

We weren't really sure to get started. The guide I was following said to put a 19mm 6 point socket onto the crank pulley bolt and click it over and it would bust right off. Well needless to say it didn't bust at all. I may have to find an impact wrench once I get the engine out.

Here's the crank pulley with a 19mm 6 point socket on a wrench with a breaker bar slid over it connected to the ground. Maybe I didn't do it right. The guide wasn't clear.

Since I didn't have a 24 mm socket to drain the transmission fluid and the drain plug looked like it was in there pretty damn good there was no way I'd be able to get it off without stripping it. I decided to skip the step. Hey I had 2/3 drained with no mess might I add. I got inside and took out the glove box and kick panels to get to the ECU and ABS computers. These big ass boxes control the cars electronics and engine. I wonder if a smaller arduino could be programmed to control it. Now that would be pretty cool. I disconnected these connectors, and pulled the computers out.

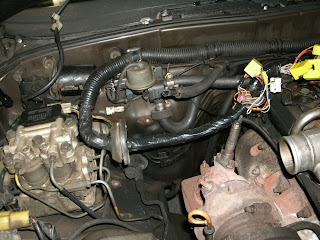
Here you can see the wire harness pulled from the firewall. I'm glad I had an extra set of hands to do this because if i didn't have someone pushing while i was pulling and vice versa it would have been a nightmare. I think the grommet holding the wires was the hardest thing to get off so far. I also took off the charcoal canister in this picture to get to the wire grommet. It gave a lot more room and was less hassle.

Still frustrated about the tranny situation I decided to skip some more steps and pull off the intake and 3000 pipe connectors. Some of these hoses were so old and cracked I couldnt tell if they were busted before I started pulling or not. The thicker hoses cracked, the ones that attach to the intake going to the turbo. I'm hoping they won't be expensive to replace and regular old thick rubber hoses will work alright.

Intakes are now off. Gave me the opportunity to look at the turbo. I took off the heatshield to the turbo.

Compressor turbine doesn't look great, but the good thing is there is no shaft play. At least that's what everyone on the forum seems to care about. Not that I care I'm going to swap this for a borg warner turbo.

Sunday, January 16, 2011

Coolant Blasts me With Piss

My coolant overflow tank will be near the full line, but immediately after starting it begins to fill up to the point where it overflows onto the driveway. I figured id check the radiator by looking for bubbles under the cap. That would tell me I have a blown head gasket which I was actually hoping for.
I took this video, its right after I started the car on a 40 degree day. I don't think this is supposed to happen, possibly have something blocking the flow?

Saturday, January 1, 2011

Shifter Boot + Ebrake Mockup


I put the shifter boot and e-brake covers that I made in the car to see how they would match with the interior. I think they look pretty good. The armrest is in good condition and I'm not sure if it should be changed.


Time to clean the garage and make space for the engine pull.

Thursday, December 30, 2010

New Shifter Boot

I was sick of the 23 year old cracked, ugly shifter boot. I took the stock one apart and used it as a template. I think it came out nicely. I will be doing the e-brake boot as well.

From this:
 To this!

Monday, December 27, 2010

Power Steering Update

After a couple days a spot developed under the car. I know that its power steering fluid because its kinda red. I'm not sure why its leaking yet, but I snapped a picture from the area of the car directly above the spot.

I can't tell if its the high pressure or return line coming from the rack that has the leak. I also can't tell if the previous owner tried to bandage the leak with a rag? I don't think the rack itself is leaking however.

Friday, December 24, 2010

Power Steering Fixed

Driving a car without power steering isn't fun. Especially when it is supposed to have it. When I checked the reservoir I saw that it was bone dry. Not a drop of fluid in there. Rather than going through all the work of replacing the power steering pump and high pressure lines I figured I'd give the fluid a shot. For $3 its worth a shot. So I bought a quart of power steering fluid and started filling up the reservoir with fluid with the car on. It started circulating and bubbling a lot. I had my dad turn the wheel from left to right locking positions and it was working without making any noise really.

Shut the car off because lots of bubbles and foam were forming. Let it sit for 30 mins, and I started taking apart the dashboard. My next goal is the speedometer and odometer, which I'm guessing are linked. Time will tell if its leaking or not.

Sunday, December 19, 2010

First Repair


I know I said the first repair was going to be the power steering, but when I was cleaning it up and vacuuming I found the clutch pedal rubber cover in the back seat. Don't ask me how it got there but I decided to make it right and put it on the correct pedal! Wasn't difficult but it took some finagling to slip it on. Now it fits like a glove.

While cleaning I discovered that the car needs floor mats all around and the discoloring in the drivers side carpet looks like it may be something that leaked. I can't tell for sure but maybe the clutch cylinder?